What amigurumi is, in one calm sentence
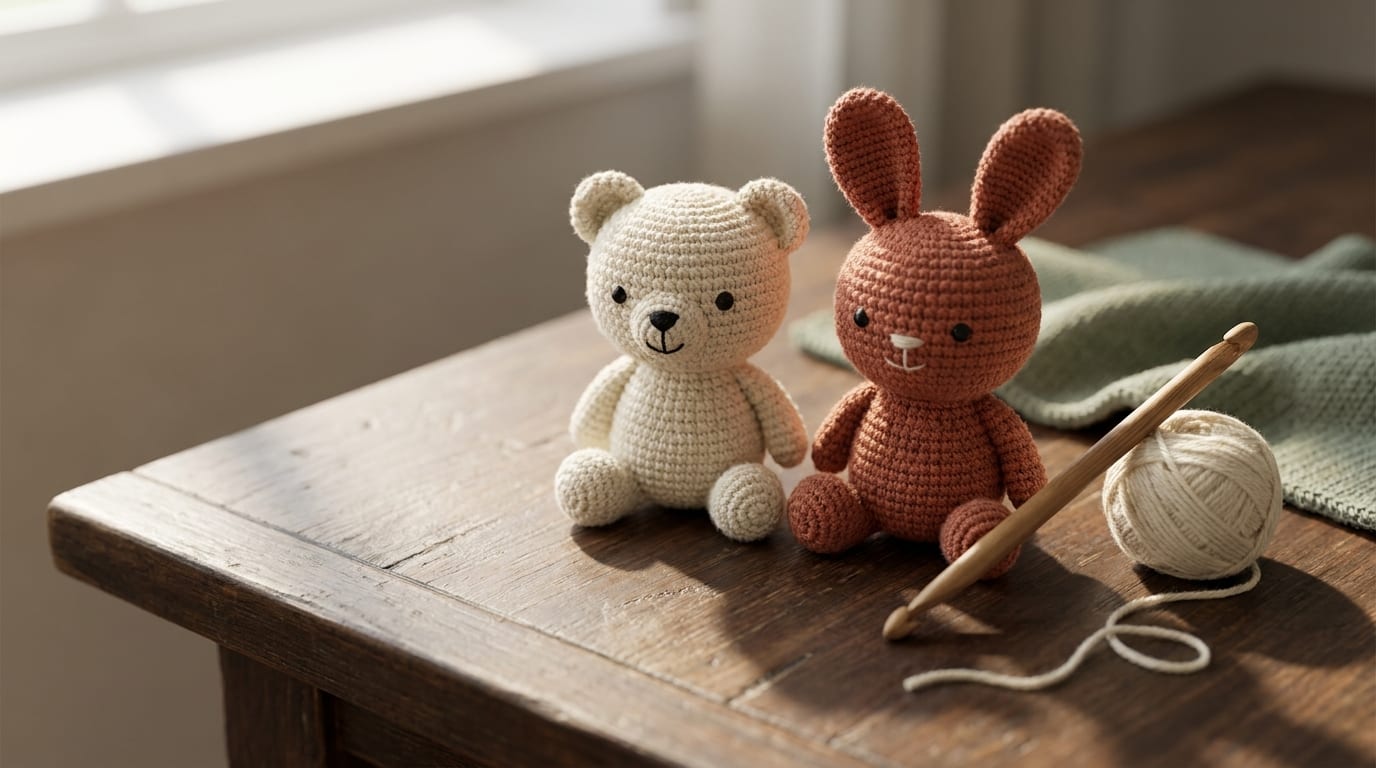
Amigurumi (pronounced ah-mee-goo-roo-mee) is the Japanese craft of crocheting small stuffed creatures and characters, the round little bears, bunnies, and food-with-faces you have probably seen in shop windows and on every craft feed. Most amigurumi is crocheted, though some makers knit it. The shapes look complicated, but they come from a surprisingly short list of moves, and a complete beginner can finish a recognizable animal in an evening or two.
This is the anchor guide to the whole craft. By the end you will know what the word means, the one technique that defines amigurumi crochet, the small vocabulary you actually need, why the hook is smaller than the yarn label says, and how the round shapes are built. We will keep it gentle and point you to deeper guides for each piece, so you can go as slow or as fast as you like.
If you have never held a hook at all, read our calm introduction to crochet first. It covers the basic stitches in plain language, and then this page will click into place.
What the word amigurumi means
The amigurumi meaning is hiding in plain sight inside the word itself. It is a Japanese term that combines ami, meaning crocheted or knitted, with nuigurumi, meaning a stuffed doll. Put them together and you get, roughly, a knitted or crocheted stuffed toy. That is the whole definition. Amigurumi is not a single pattern or a brand. It is a category, the way "blanket" is a category, and it covers anything small, soft, and stuffed that you make with yarn.
The craft as we know it grew up in Japan and spread worldwide through the internet over the last two decades. The aesthetic leans cute on purpose: oversized heads, tiny limbs, simple faces, soft colors. A finished piece sits in your palm and looks back at you. That charm is most of the reason people pick up a hook in the first place, and it is why amigurumi has pulled so many brand-new crafters into crochet.
One small clarification, since it trips people up. Amigurumi describes the finished object and its style, not a stitch. The stitch doing almost all the work is the humble single crochet. What makes amigurumi its own thing is how you use that stitch, which is the next section.
The one technique that defines amigurumi
If you remember nothing else, remember this. Amigurumi is worked in a continuous spiral of single crochet (sc), not in joined rounds. That single choice is the heart of the craft.
In a lot of crochet worked "in the round," you finish each round, join the last stitch to the first with a slip stitch, then start the next round fresh. That join leaves a small seam running up the side of the work. For a doily or a hat brim, fine. For a smooth toy, that seam is a flaw you would see down the side of the head.
So amigurumi skips the join. You work single crochet around and around in an unbroken spiral, the way the thread winds up a ball, and you never close a round. The result is a smooth tube of fabric with no seam and no line up the side. The trade is that the start of each round is no longer obvious, because there is no join to mark it. The fix is a single stitch marker (a safety pin, a scrap of contrasting yarn, even a paperclip) dropped into the first stitch of each round. When you come back around to the marker, you know one round is done. Move the marker up, keep going.
That is the technique. A small note for UK readers, because the terms collide: US single crochet is the same stitch UK patterns call double crochet (dc). Almost every amigurumi pattern online is written in US terms, so when a pattern says single crochet, UK crafters work what they call a double crochet. If you want the stitch broken down motion by motion, our guide to the single crochet stitch walks through it slowly.
The small vocabulary you actually need
The language of amigurumi is short. Learn these five terms and you can read most patterns labeled beginner. Each one has a deeper guide if you want it, but a single line is enough to start.
- Magic ring. The adjustable loop you crochet your first round into, then pull tight so there is no hole in the center of the toy. It is how nearly every amigurumi begins. Full walkthrough in our magic ring tutorial.
- Single crochet (
sc). The short, dense stitch that builds the whole fabric. Insert, yarn over, pull up a loop, yarn over, pull through both loops. See the single crochet stitch guide for the step by step. - Increase (
inc). Two single crochet worked into the same stitch. This is how the fabric grows wider, which is how a flat circle becomes a curved sphere. - Invisible decrease (
inv dec). The neat way to make the fabric narrower. Worked through the front loops only of the next two stitches, it is far tidier than a standardsc2togand leaves almost no gap. This one move separates clean amigurumi from lumpy amigurumi. - Fasten off. How you finish a piece: cut the yarn, pull the tail through the last loop, and weave in the end. For a closed sphere you usually thread the tail through the final stitches and cinch the hole shut first.
That is genuinely the core of it. Magic ring to start, single crochet to build, increase and decrease to shape, fasten off to finish.
Why the hook is smaller than the label says
Here is the rule that surprises every beginner. For amigurumi, you use a hook one to two sizes smaller than the yarn label recommends.
A worsted weight yarn (UK aran) usually lists a hook around 5.0 to 5.5 mm on the band. For a toy, you reach for something closer to 3.5 to 4.0 mm instead. The smaller hook pulls the stitches in tighter and makes a dense, firm fabric.
The reason is the stuffing. A toy is hollow, then packed with fiberfill. If your fabric is loose and airy, the white stuffing peeks through the gaps between stitches, or worse, works its way out over time. A tight fabric holds the stuffing in and holds the toy's shape, so the head stays round and the limbs stay plump. You are trading drape and softness, which you would want in a scarf, for structure, which is exactly what a toy needs.
This is also why amigurumi forgives a beginner. Most crochet asks you to match a pattern's gauge so the finished thing fits a body. A toy has no body to fit, so your gauge does not have to match anyone else's. The only rule is that the fabric must be tight enough that no light or stuffing shows through. If you hold your work up to a window and see daylight between the stitches, go down a hook size. When you are choosing materials, our guide to yarn for amigurumi covers which fibers hold a shape well and which to skip.
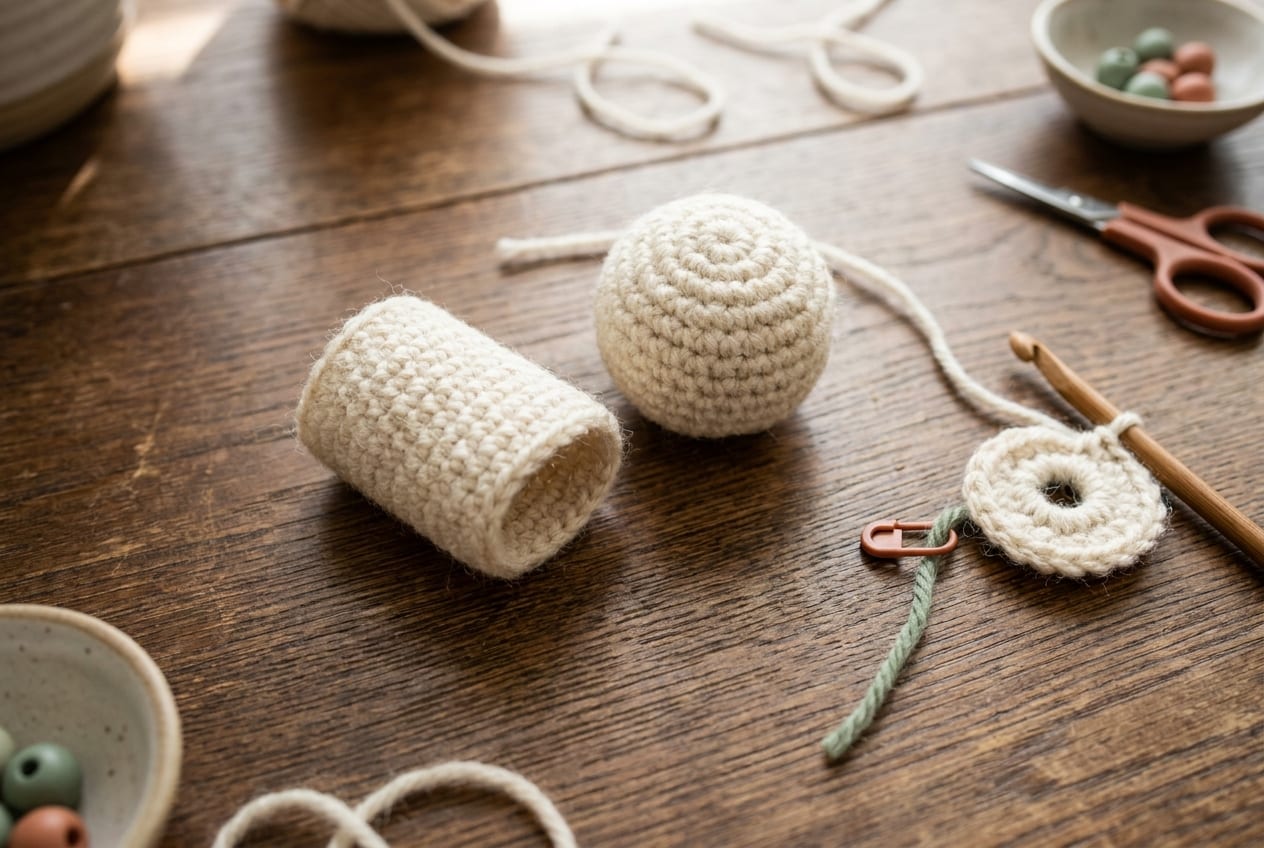
How the shapes get built
This is the part that looks like magic and turns out to be arithmetic. Every amigurumi shape, round head, plump body, little arm, comes from balancing just two moves: the increase and the decrease. Where you place them, and how often, decides the form.
A sphere, for a head
A sphere is the workhorse shape, used for heads and round bodies. The recipe is symmetrical. You start with a magic ring of single crochet, then increase steadily for about six rounds, adding stitches each round so the flat circle starts to cup and curve upward into a bowl. Then you work even, no increases or decreases, for a few rounds, and the bowl becomes the straight middle of the ball. Finally you decrease for about six rounds, mirroring the increases, so the open bowl curls back in and closes. You stuff it firmly just before the opening gets too small to work through, then cinch the last stitches shut. Increase, hold, decrease. That is a ball.
A tube, for a limb or body
A limb is simpler. You increase for only a round or two to set the width you want, then work even, round after round, with no further shaping. The fabric runs straight down into a tube. A short fat tube is a leg, a long thin one is an arm, a wide one is a body. Some pieces taper at the end with a few decreases, some stay open to be sewn on flat. The whole skill is deciding how wide and how long.
That genuinely is the shaping toolkit. Once you can make a sphere and a tube, you can make almost any creature, because nearly every animal is a collection of spheres and tubes in different sizes.
Safety eyes and stuffing
Two things give a toy its character and its safety, and both go in before you close a piece up, so timing matters.
Eyes. The classic choice is plastic safety eyes, a small domed post that pushes through the fabric from the front, with a washer that locks onto the post from the back so it cannot be pulled out. You place them while the head is still open, judge the spacing (eyes set low and wide read cuter than you expect), and push the washers on. Once a washer is on, it is permanent, so check the placement twice before you commit.
There is one important exception. For any toy meant for a child under three, skip the safety eyes entirely and embroider the eyes with yarn instead. Safety eyes are well made, but if a toy is chewed, washed hard, or damaged over years, a loosened eye becomes a choking hazard. Embroidered eyes carry no such risk, and a couple of stitched French knots or small ovals look lovely. When in doubt about who will end up holding the toy, embroider.
Stuffing. Amigurumi is stuffed with polyester fiberfill, the same soft white fiber inside cushions. Add it gradually as you go, and pack it firmly, but not so hard that it stretches the stitches apart and lets the fabric show through. You are aiming for a toy that holds its shape and has a little give when you squeeze it, not a rock. Underfill and the head slumps. Overfill and the stitches gape. A few toys in, your hands learn the right pressure. Always stuff before you close a piece, because once it is sewn shut, that is that.
Putting the pieces together
Most amigurumi is made in parts. You crochet the head, the body, the arms, the legs, and the ears as separate pieces, then assemble them at the end. This is good news for a beginner, because each piece is small and finishable, and you are never wrestling one giant project.
Assembly is done with a yarn needle and the long tails you left when you fastened off each piece. You pin the parts in place first (long sewing pins or even toothpicks help you audition the pose before it is permanent), step back, and adjust until the proportions look right. Then you sew. This stage has more effect on the final look than people expect. A head sewn on slightly crooked, or arms set too high, changes the whole personality of the toy. Take your time pinning, because the sewing is quick once the placement is settled.
Some patterns are worked all in one piece to skip assembly, which is worth seeking out for a very first project. When you are ready to choose one, our library of amigurumi patterns is sorted by difficulty so you can start easy.
How long it takes and what to make first
A first amigurumi usually takes a few hours of actual work, spread across an evening or two. The magic ring and the rhythm of the spiral are the parts that feel slow at the start. Once they become automatic, the same toy that took you four hours the first time takes under two. Speed comes faster in this craft than in most, because you are repeating one stitch thousands of times.
For a first project, choose small, simple, and worked in as few pieces as possible. Good first toys share a few traits:
- One or two pieces. A ball-shaped animal that is mostly head, or a single-piece body, skips the fiddly assembly while you are still learning the stitches.
- A single color. Color changes are a separate skill. Learn the spiral first, add color later.
- Embroidered or simple features. Fewer add-on parts means fewer tails to weave and fewer chances to get discouraged.
A round bunny, a roly-poly bear, or a little octopus are all classic starters for exactly these reasons. They drill the magic ring, the spiral, and the invisible decrease, which are the three skills behind every toy you will make after. For a full, hand-held walkthrough of your first one, start to finish, head straight to our amigurumi for beginners guide. If you would rather make a person than an animal, the crochet doll guide covers the faces, hair, and body shapes that set dolls apart.
Frequently asked questions
What does amigurumi mean?
Amigurumi is a Japanese word that combines ami, meaning crocheted or knitted, with nuigurumi, meaning a stuffed doll. Together it means a knitted or crocheted stuffed toy. Today the term usually refers to small crocheted creatures and characters with a cute, rounded style.
Is amigurumi hard for beginners?
Amigurumi is one of the friendlier ways to start crochet. It uses mostly a single stitch, the single crochet, worked in a spiral, plus simple increases and decreases. There is no gauge to match, since a toy has no size to fit. Most beginners finish a recognizable animal in an evening or two.
What is the difference between amigurumi and regular crochet?
Amigurumi is regular crochet used a specific way. It is worked in a continuous spiral of single crochet with no joined rounds, so there is no seam, and it uses a hook one to two sizes smaller than the yarn label says to make a dense fabric that hides the stuffing. The result is a small, firm, stuffed shape rather than a flat fabric.
What yarn and hook do I need for amigurumi crochet?
A smooth worsted or DK weight yarn in a light color is ideal, because light yarn makes your stitches easy to see. Pair it with a hook one to two sizes smaller than the band recommends, often around 3.5 to 4.0 mm for worsted, so the fabric is tight enough that the stuffing cannot show through.
Are safety eyes safe for babies?
Plastic safety eyes lock on with a washer and are secure for older children and adults, but they are not recommended for toys given to children under three. If a toy is damaged over time, an eye can come loose and become a choking hazard. For babies and toddlers, embroider the eyes with yarn instead.
How long does it take to make an amigurumi?
A simple first amigurumi takes a few hours of work, usually spread across an evening or two. As the magic ring and the single crochet spiral become automatic, the same toy takes under two hours. Larger or multi-piece designs take longer, mostly because of the assembly at the end.