What a magic ring is, and why amigurumi needs it
A magic ring is an adjustable starting loop for crocheting in the round. You make a loose loop of yarn, work the first round of stitches into it, then pull the yarn tail to cinch the loop shut. When it closes, there is no hole left in the center. That single trait is why magic ring crochet is the standard way to start amigurumi, the craft of small crocheted stuffed toys, where any gap at the center would let the stuffing peek through.
You will see the same technique under a few different names. Magic circle crochet, adjustable ring crochet, and magic loop crochet all describe the same loop. The names change from pattern to pattern, but the move is identical, and this guide walks through it one slow step at a time. By the end you will be able to make the loop, work a round of single crochet into it, close it without a hole, and fix the most common thing that goes wrong, which is a ring that loosens later.
If amigurumi is new to you, our amigurumi for beginners guide covers the wider picture, and what is amigurumi explains where the craft comes from.
The chain-2 alternative, and the hole it leaves
Most people meet a different start first, before anyone shows them the magic ring. The common beginner method is to chain 2 and work all the first-round stitches into the second chain from the hook. A close cousin is to chain 4 and join with a slip stitch into a ring, then work into the center space. Both are easy to understand, and both work. The problem is the same in each case: they leave a small hole at the center, and that hole tends to loosen and widen over time as the piece is handled.
For a flat coaster or a granny square, a tiny center hole is fine, sometimes even part of the look. For a stuffed toy it is a real flaw. The fiberfill inside an amigurumi pushes outward against every stitch, and a center hole gives the stuffing a place to show or escape. The magic ring solves this directly, because you pull it completely shut. That is the whole reason to learn it. Once the loop is cinched, the start of your piece is a tidy, closed center with nothing poking through.
The chain (ch) and single crochet (sc) are the only two stitches you need to know first. If either is unfamiliar, the chain stitch and single crochet stitch pages have step-by-step photos.
What you need
The supply list is short, and you almost certainly have it already.
- Your yarn and the hook your pattern calls for. For practice, a smooth light-colored worsted weight yarn and a US size H (5.0 mm) hook make the loop easy to see.
- A stitch marker. A locking marker, a scrap of contrast yarn, or even a bobby pin. Amigurumi is usually worked in a continuous spiral, and the marker tracks where each round begins.
- A yarn needle, for weaving in the tail securely once the ring is closed. A well-woven tail is what keeps the ring from loosening later.
That is everything. The magic ring itself uses no extra tools, just the yarn, the hook, and your hands.
How to crochet a magic ring, step by step
This is the heart of the tutorial. The steps below are described for a right-handed maker. A left-handed maker mirrors the whole thing, and there is a short note on that further down. The example uses single crochet (US single crochet, UK double crochet), because that is what nearly every amigurumi pattern asks for in the first round.
Take it slowly the first time. The loop feels awkward for about thirty seconds, and then your hands understand it.
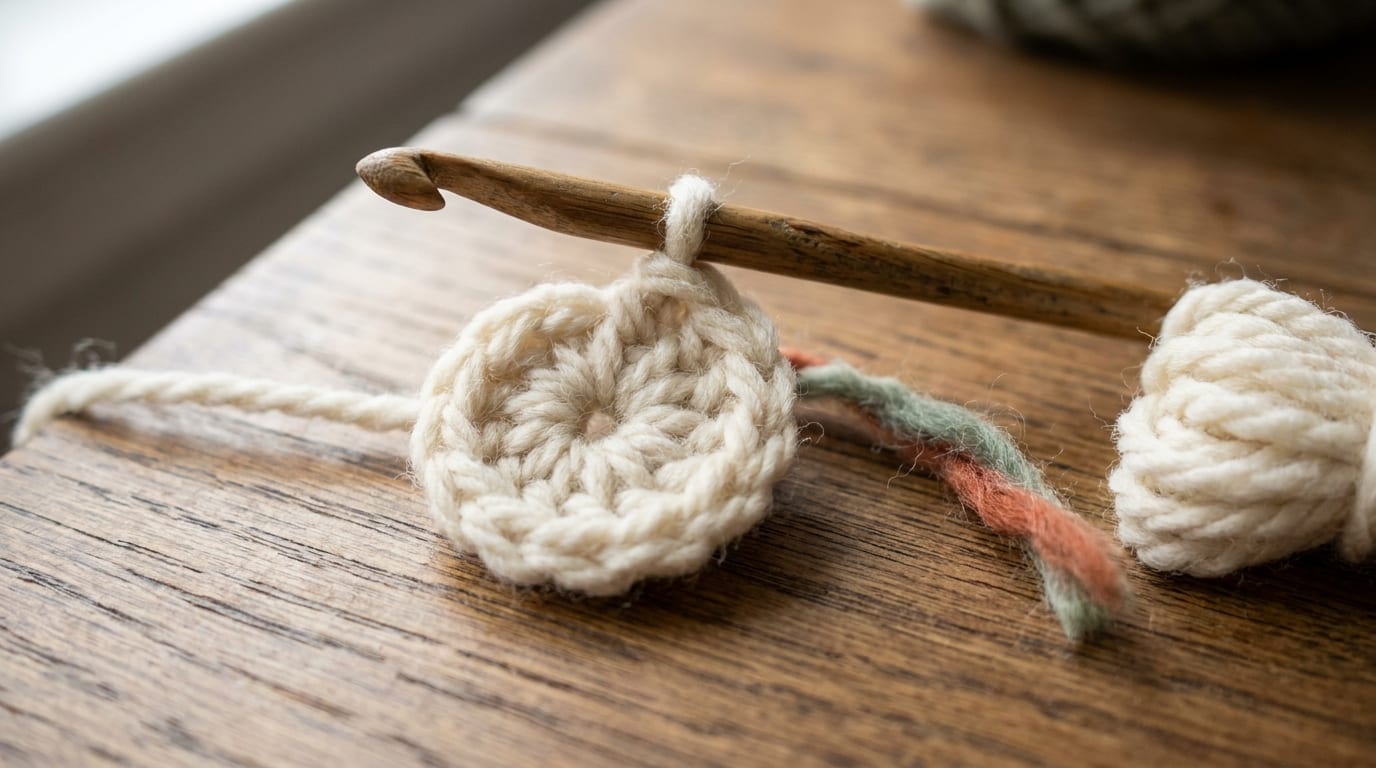
- Make the loop. Drape the yarn over your open hand with the tail hanging down past your fingers. Bring the working yarn (the strand that runs to the ball) across and over the tail to form a loop, and pinch the crossing point between your finger and thumb to hold it. You now have a loose ring of yarn held closed at the bottom by your pinch.
- Pull a loop through. Insert the hook through the ring from front to back, catch the working yarn, and draw it back through the ring. You now have one loop on the hook. This does not count as a stitch.
- Lock it with a chain. Yarn over and pull through that loop on the hook. This small anchoring chain holds everything in place. It does not count as a stitch either, so do not include it when you count the round.
- Work the first round into the ring. For a single crochet, insert the hook into the center of the ring so it passes under both strands at once, the loop strand and the tail. Yarn over, pull up a loop (two loops on the hook), yarn over again, and pull through both loops. That is one single crochet worked into the ring. Repeat until you have the number your pattern asks for, which is usually 6 single crochet. Keep them snug against each other and slide them around the ring as you go so they sit evenly.
- Cinch it shut. When all the stitches are made, hold the round of stitches together and pull the tail firmly. The ring tightens, the stitches draw in around the center, and the hole disappears. More on this in the next section.
- Keep going in the round. Place a stitch marker in the first stitch of the round so you can find it again, then continue in a spiral into the round below, or join the round with a slip stitch if your pattern tells you to. From here you are crocheting in the round like normal.
How to close the magic ring
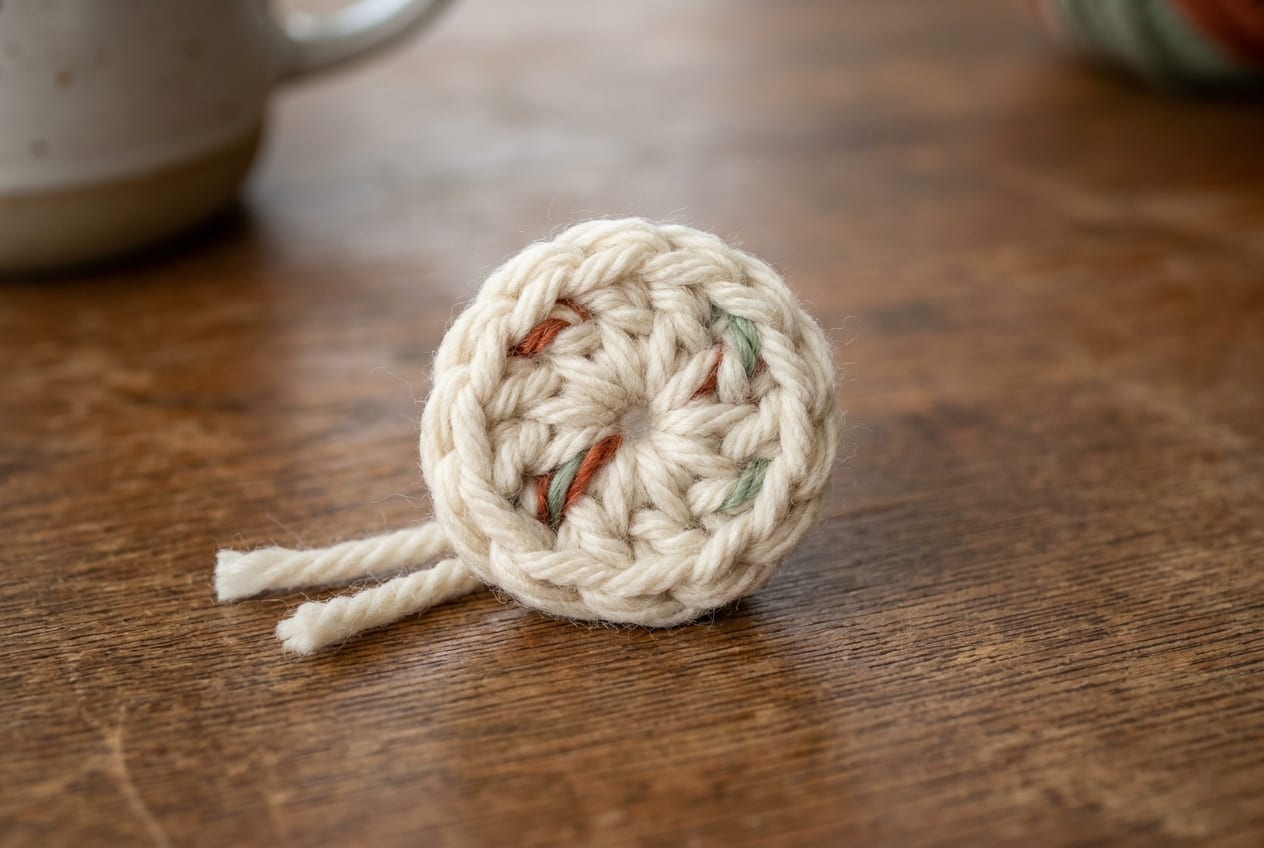
Closing the ring is the moment the whole technique pays off, and it is simpler than it looks. Once your stitches are all worked, find the loose tail, the short end you left hanging at the start. Pull it slowly and firmly. As you pull, the loop at the center shrinks and the bottoms of all your stitches slide together until they meet. Keep pulling until the center is fully closed and you cannot see a gap.
Sometimes the magic ring is a double loop, where you wrapped the yarn around your hand twice before starting. With a double loop you may have two strands to pull. Tug each one a little to see which closes the ring, then snug them both. A double-wrap ring takes slightly more effort to cinch but holds extra firmly, which some makers prefer for toys that get handled a lot.
Once the center is shut, weave the tail into the back of the stitches with your yarn needle, going in two or three different directions so it grips. A well-woven tail is what keeps the ring closed for the life of the piece.
Troubleshooting a magic ring
A few things trip up almost everyone the first few times. Here is what goes wrong and how to fix it.
The ring loosens later
This is the most common worry, and the fix lives in the tail. After you cinch the ring, give the tail one small extra tug to seat it, then weave it in thoroughly, in two or three directions through the backs of the stitches. The friction of a well-woven tail holds the ring shut on its own. Some makers add a tiny knot before weaving for extra security, and that is fine, though a properly woven tail usually holds without one.
You lose count of the stitches
Six stitches into a small loop are easy to miscount. Drop a stitch marker into the first stitch of the round as soon as you make it. It marks where the round begins and gives you a fixed point to count from, so you always know how many you have worked and where the next round starts.
The loop is too tight to work into
If the ring is so small you cannot get the hook and yarn into the center comfortably, you cinched the starting pinch too far before working. Start over and make the initial loop a little larger, leaving enough open space to fit your stitches. The loop only needs to close at the end, so keep it roomy while you work the round.
Pulling the tail does not close the ring
You always pull the tail end to close a magic ring, not the working yarn that runs to the ball. If you pull the tail and the wrong loop moves, follow the tail with your eyes from where it hangs to where it enters the stitches, and find the strand that actually tightens the center. Pull that one. On a single-loop ring it is the tail; on a double-loop ring it may be one of two strands, so test gently before you pull hard.
A note for left-handers
Everything above is described for a right-handed maker, and a left-handed maker simply mirrors it. Cross the working yarn under the tail instead of over it when you form the loop, and work the round in the opposite direction, so what reads as right-to-left becomes left-to-right for you. The stitches, the count, and the cinch-the-tail finish are all exactly the same. If you learn by watching, hold a right-handed video tutorial up to a mirror, or look for one filmed left-handed, and the motions will line up with your hands.
With the magic ring under your belt, you are ready for the round-based shaping that makes up most stuffed toys. Our amigurumi for beginners guide takes it from here, and you can browse projects to try in our amigurumi patterns collection.
Frequently asked questions
What is a magic ring in crochet?
A magic ring is an adjustable starting loop for crocheting in the round. You work the first round of stitches into a loose loop, then pull the yarn tail to cinch it shut. It closes with no hole in the center, which is why it is the standard start for amigurumi.
Is a magic ring the same as a magic circle or adjustable ring?
Yes. Magic ring, magic circle, adjustable ring, and magic loop are all names for the same technique. Patterns use the terms interchangeably, so do not let the different wording confuse you. The loop you make and the way you close it are identical in every case.
Why use a magic ring instead of chaining 2?
Chaining 2 and working into the second chain, or chaining 4 and joining into a ring, both leave a small center hole that loosens over time. A magic ring pulls completely shut, so there is no hole. For stuffed toys, that closed center keeps the fiberfill from showing through.
How do I keep my magic ring from coming loose?
Give the tail a small extra tug after cinching, then weave it into the backs of the stitches in two or three directions with a yarn needle. The friction of a well-woven tail holds the ring shut. Some makers add a tiny knot first for extra security, though it is usually not needed.
Which strand do I pull to close a magic ring?
Pull the tail end, the short strand you left hanging at the start, not the working yarn that runs to the ball. If pulling the tail moves the wrong loop, follow the tail with your eyes to find the strand that tightens the center, then pull that one firmly.
How many stitches go in a magic ring?
It depends on the pattern, but most amigurumi rounds start with 6 single crochet worked into the ring. Some patterns call for more, such as 8 or 12. The anchoring chain you make when you lock the loop does not count as one of those stitches.