Why crochet blanket edging makes a blanket look finished
A crochet blanket edging is the round (or few rounds) of stitches you work around the outside of a finished blanket to frame it and tidy the edge. It is the difference between a blanket that looks homemade and one that looks made. The body of a blanket can be lovely, and the edge can still let it down: the row-end sides go slightly wavy, the corners curl, and the whole thing reads as unfinished.
A border fixes all of that at once. It evens out the uneven sides, where row-ends never sit as neatly as the top and bottom. It frames the work, the way a mat frames a print. It adds durability, because a worked edge does not stretch and sag the way a raw edge does after a few washes. And it quietly makes a wobbly beginner edge look intentional, which is worth more than any single stitch you will learn this year.
This guide walks through the one prep step almost everyone skips, then five borders from plain to fancy, how to turn the corners, and how to keep the whole thing flat.
The even prep round (the step everyone skips)
Before any decorative border, you work one even foundation round of single crochet (UK: double crochet) all the way around the blanket. This round is the unsung hero of every good edge. Skip it and the fancy border sits on top of a bumpy, uneven base, so it looks bumpy and uneven too. Get it right and everything after it falls into place.
Here is the rhythm, worked in order around the blanket.
- Across the top and bottom, work one single crochet into each stitch. These edges already have a tidy row of stitch tops, so you match them one for one.
- Down the two sides, you are working into row-ends rather than stitch tops, so there are no neat stitches to follow. Space your single crochets evenly along the edge. A common rhythm is about 2 to 3 single crochets for every 3 rows. Adjust as you go so the side lies flat, neither pulling in nor rippling out.
- At each corner, work 3 single crochets into the corner stitch. Those extra stitches give the border room to pivot around the corner without puckering.
- Join the round with a slip stitch and weave the tail later.
That is the whole trick. The sides are where it lives or dies, because the side count is a judgment call, not a one-to-one match. If you have never worked a plain row of these, the single crochet stitch guide covers the mechanics so this round goes smoothly. Once this even round is done, every border below is just a variation worked on top of it.

Simple borders: single crochet and crab stitch
If you want a clean edge with no fuss, these two are where to start. Both build straight onto the prep round, and both suit a modern blanket where you want the edge quiet rather than decorative.
Simple single crochet border
The plainest border is just more of the prep round: one or more rounds of single crochet, with 3 single crochets in each corner on every round. One round reads as a tidy outline. Two or three rounds in a contrast color read as a deliberate frame. It is clean, modern, and almost impossible to get wrong once the prep round is even. This is also the friendliest first border for a beginner, and it pairs well with the projects in our crochet blanket for beginners guide.
Reverse single crochet (crab stitch)
The crab stitch is a single crochet worked backward, left to right instead of the usual right to left. That reversed direction twists each stitch into a small bump, and the row of bumps forms a neat corded, rope-like rim along the edge. It looks more finished than plain single crochet but takes no new skill, just a new direction. It also resists curling, which makes it a favorite final round to settle any edge that wants to roll. Work it as a single round on top of one or two rounds of plain single crochet for the cleanest result.
Decorative borders: shell, picot, and granny
When you want the edge to be part of the design, these three add texture and shape. Each one still sits on the even prep round, so the prep work pays off here most of all.
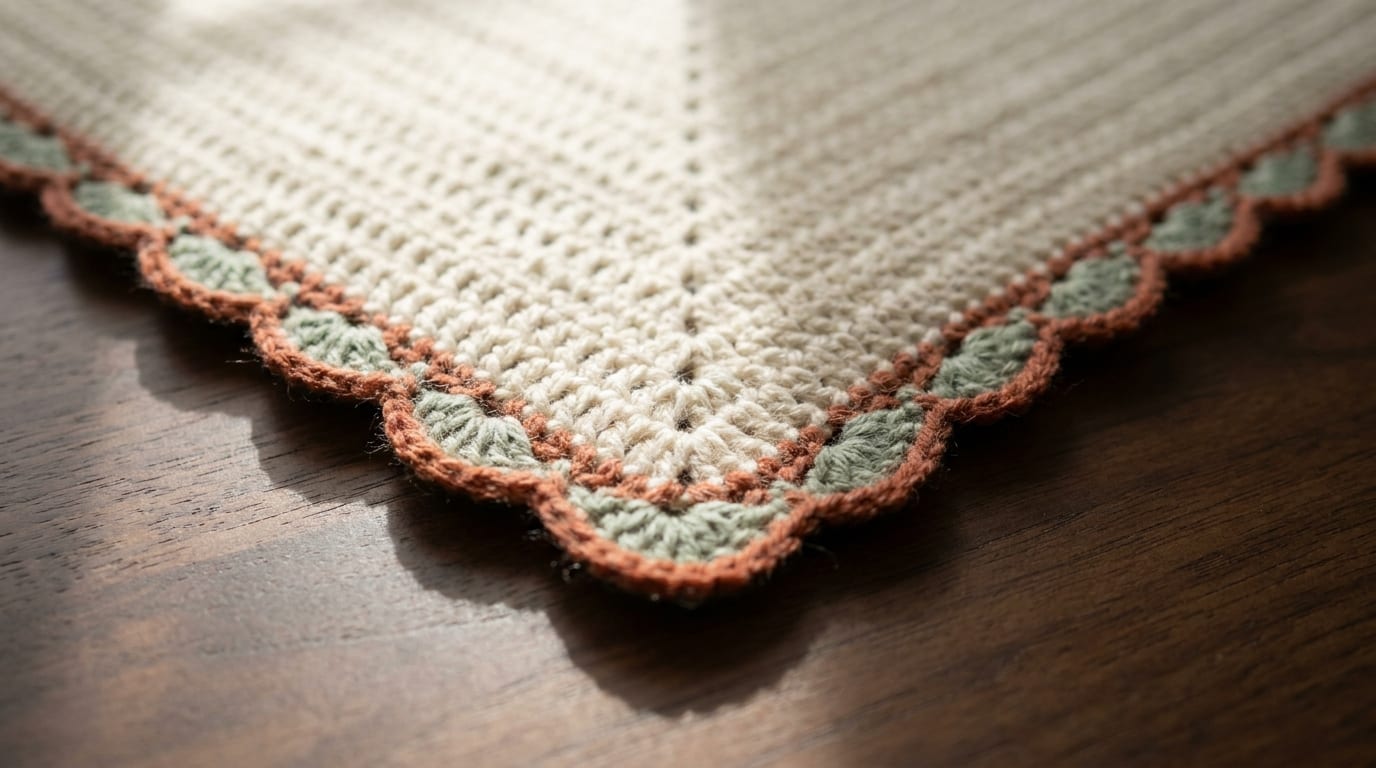
Shell or scallop border
A shell border fans groups of double crochet (UK: treble crochet) into the edge, skipping a stitch or two between each group so the fans sit side by side as scallops. The classic version is something like five double crochets into one stitch, skip two stitches, single crochet into the next, skip two, then another shell. It gives a soft, rounded, decidedly classic edge. Shells repeat over a set number of stitches, so plan your prep-round count to divide evenly by the repeat (more on that below). The shell stitch page breaks down the fan itself if you want to practice on a swatch first.
Picot edging
A picot is a tiny chain point: chain 3, then slip stitch back into the base to pull it into a little nub. Dot these along a round of single crochet, with a few stitches between each one, and you get a dainty, pointed trim that looks delicate without being fussy. It suits baby blankets and lacy throws. Picots add almost no width, so they finish an edge rather than frame it.
Granny border
If your blanket is built from granny squares, a granny border ties the whole thing together. You work rounds of granny clusters, the familiar 3 double crochets and a chain 1, around the edge, treating the perimeter like the outer round of one giant square. It gives a textured, classic frame that matches the body stitch exactly. Our granny square blanket guide covers the cluster rhythm if you are pairing this border with that project.
Turning the corners so they lie flat
Corners are where most borders go wrong, and the rule that saves them is the same across every style: add extra stitches at each corner so the work can fan around the turn instead of cupping.
For a single crochet or crab stitch border, that means 3 single crochets worked into the corner stitch on every round. For taller borders, where each stitch eats more length, a small gap helps the turn breathe, so a common corner is a (single crochet, chain 2, single crochet) group worked into the corner space. Shell borders often place a full shell right at the corner for the same reason.
Whatever the border, the logic does not change. A corner has to cover more distance on the outer edge than on the inner edge, so it needs more stitches there. Too few and the corner pulls in and cups like a shallow bowl. Add the extra stitches and it lies flat and square.
Keeping the border flat: ruffle versus cup
A border that does not lie flat is sending you a clear message, and learning to read it saves a lot of unpicking.
- If the border ruffles and waves like a lettuce leaf, you added too many stitches along the sides. The edge has more fabric than the space allows, so it buckles. Pull back and space the side stitches a little farther apart.
- If the border cups and pulls the edge inward, you added too few stitches. The edge is too tight for the blanket, so it draws in. Pull back and add a few more along the sides, or more into the corners.
Almost every flatness problem traces back to the prep round, which is exactly why that round matters. The side spacing is the variable you control, so when something ripples or draws in, the sides are the first place to look. Get the prep round flat and lay the blanket on a table to check before you commit to a decorative round on top of it. A flat foundation makes a flat border, every time.
If you are choosing a body stitch and a matching edge together, our roundup of crochet blanket stitches shows which textures pair well with which borders.
Finishing and blocking
Once the last round is joined, two small steps make the border sit crisp. First, weave in every end with a yarn needle, running each tail under several stitches in two directions so it cannot work loose in the wash. Second, block the blanket: wet it, lay it flat, and gently pin or pat it square so the border dries crisp and the corners sit at true right angles. Wool and cotton block beautifully. Acrylic holds its shape less reliably, so steam it lightly and with care rather than soaking it.
One planning note for any repeating border. If your border has a repeat, like shells over a set number of stitches, work out that multiple before you start the prep round, and aim for a prep-round stitch count that the repeat divides into evenly. That way the last shell meets the first one cleanly instead of leaving an awkward gap at the join. When the count and the corners are right, the edge does the rest. For projects to try a new border on, browse our crochet blanket patterns collection.
Frequently asked questions
Do I really need a prep round before the border?
Yes, in almost every case. One even round of single crochet around the whole blanket evens out the bumpy row-end sides and gives the decorative border a clean, regular base to sit on. Skip it and the fancy border copies every lump underneath it, so the edge looks uneven no matter how careful you are.
What is the easiest crochet blanket border for a beginner?
A simple single crochet border. After the prep round, work one or two more rounds of single crochet with 3 single crochets in each corner. It is clean, modern, and very forgiving. Add a single round of crab stitch on top if you want a neat corded edge without learning anything new.
Why does my crochet border ruffle or wave?
A rippling border means you worked too many stitches along the sides, so there is more fabric than the edge can hold and it buckles. Pull the round back and space the side stitches a little farther apart. The opposite problem, an edge that cups inward, means too few stitches, so add some.
How many stitches do I put in the corners of a blanket border?
Work 3 single crochets into each corner stitch for a single crochet or crab stitch border. For taller borders, a (single crochet, chain 2, single crochet) group gives the corner room to turn. The point is always the same: extra stitches at the corner so it lies flat instead of cupping.
Can I add a border to a blanket made of granny squares?
Yes, and a granny border suits it especially well. Work the even single crochet prep round first, then add rounds of granny clusters, the usual 3 double crochets and a chain 1, around the whole edge. It frames the blanket in the same stitch as the body, so the border looks built in.
Should I block a crochet blanket after adding the border?
If the yarn is wool or cotton, yes. Wet the blanket, lay it flat, and gently pin or pat it square so the border dries crisp and the corners sit at true right angles. Acrylic does not block reliably, so steam it lightly instead of soaking it, and handle the warm fabric with care.