
Two ways to make a granny square blanket
A granny square blanket is a crochet throw built from the classic granny motif, a small square worked outward in rounds of double crochet (UK: treble crochet) clusters. There are two honest ways to make one, and the choice shapes the whole project before you pull the first loop.
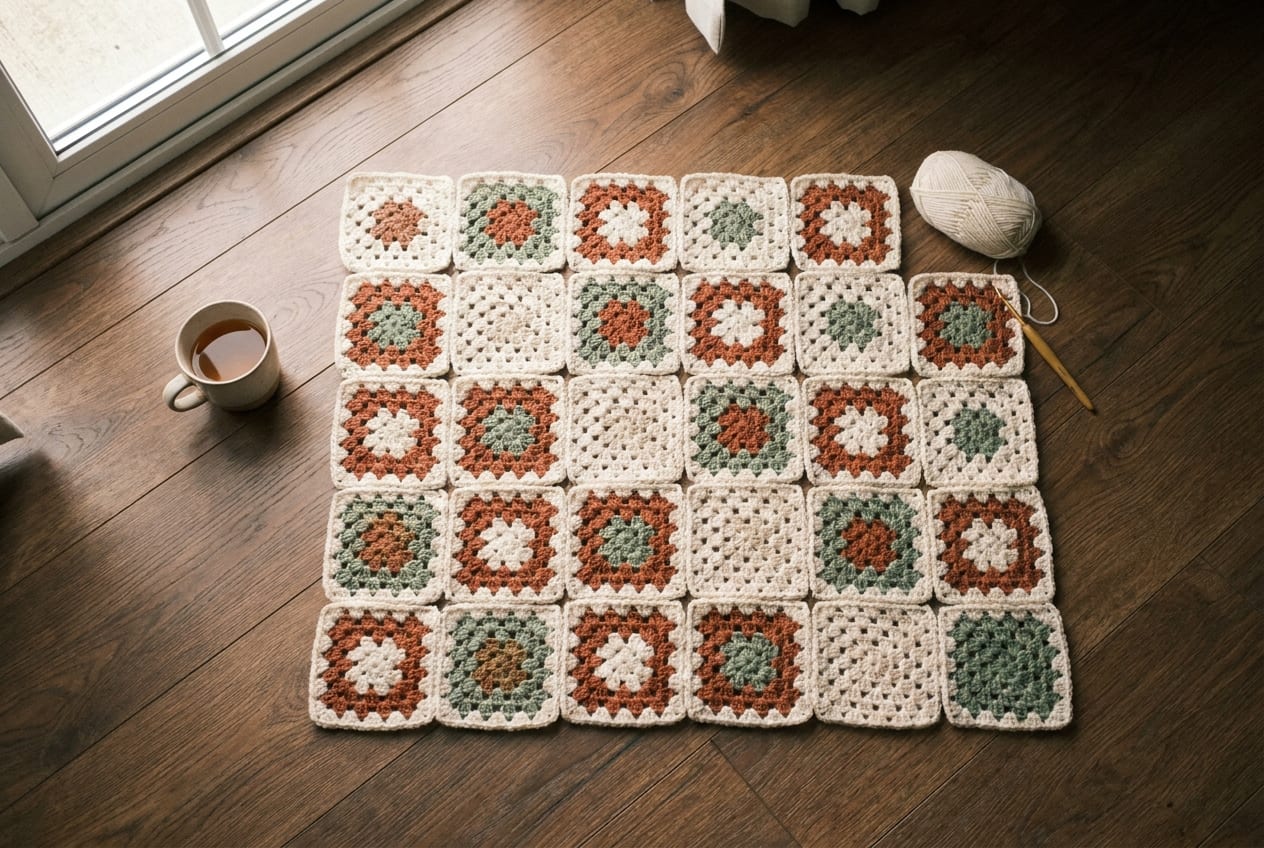
The first way is the modular approach: you crochet many small squares and join them into a grid. This is the portable one. A single square fits in a pocket, so you can work on a blanket at a bus stop or in a waiting room, and you only commit to the full size once the squares pile up. The trade is the joining, and the yarn ends.
The second way is one giant granny square. You start with the same center ring and just keep adding rounds, working outward until the single square reaches blanket size. There is no joining at all, and far fewer ends to weave in, which a lot of people love. The catch is that the later rounds get long and unwieldy. By the time the piece is throw sized, each round is a few hundred stitches, and the weight of the work sits in your lap as you go.
Neither is better. Pick the modular route if you want a take-anywhere project or you are using up odds and ends of yarn. Pick the one-big-square route if you want a simpler finish and you do not mind a heavier project as it grows. If you have never made the motif itself, start with how to crochet a granny square and come back once one square feels easy. For more projects built on the motif, browse the granny square hub.
Choosing a granny square blanket size
Before you count squares or buy yarn, decide how big the finished blanket should be. Granny square blanket sizes vary a lot between makers, so treat these as practical starting points rather than fixed rules. A lovey is meant to be small enough for a baby to grip; a throw is meant to cover a lap and then some.
| Blanket type | Approximate finished size | Notes | |---|---|---| | Lovey / security blanket | 14 to 17 in square | Small enough for little hands to hold | | Baby blanket | 30 by 40 in | Some makers do a single 36 in square instead | | Lapghan | 36 by 48 in | Covers the lap in a chair | | Throw | 50 by 60 in | The classic sofa blanket | | Twin | 66 by 90 in | Fits a twin mattress top | | Queen | 90 by 100 in | A large, long commitment |
These measurements are approximate and shift with your gauge, your border, and personal taste. A throw that reads as cozy for one person feels skimpy to another, so if you are unsure, size up by one row of squares. It is easier to live with a slightly large blanket than a slightly small one.
How many granny squares for a blanket
Here is the part people get stuck on. Working out how many granny squares for a blanket is just two measurements and a little division.
First, make one square in your chosen yarn and count its size. A standard four-round granny square in worsted weight yarn (UK: aran) comes out around 5 to 6 inches across, depending on your tension and hook. Add or remove rounds to nudge that number. Larger squares mean fewer to make and fewer seams; smaller squares give you more color play and a more detailed grid.
Then use this formula:
squares across = blanket width / square size
squares down = blanket length / square size
total squares = squares across × squares down
Round each side to a whole number, then multiply.
A worked example. Say you want a 30 by 40 inch baby blanket and your squares measure 6 inches each. Thirty divided by six is five squares across. Forty divided by six is about 6.7, which you round up to seven squares down. Five times seven is 35 squares, plus a border around the edge. That border adds an inch or two per side, so the finished blanket lands a little over the target, which is exactly what you want.
If you change your square size, the count changes fast. Drop to 5 inch squares for that same blanket and you need six across by eight down, which is 48 squares. The gauge calculator does this square-size math for you once you have measured a single motif, so you are not guessing at the grid.
Joining methods, compared
Once your squares are made, you join them. The method you pick changes how the blanket looks and how long the finishing takes. Here are the four common ones, from simplest to most advanced.
Join-as-you-go (JAYGO). You join each new square to its neighbors during the final round, so the seaming happens as you build. There is no separate joining step at the end, and far fewer ends to weave in. It is tidy, popular, and the friendliest option if the thought of seaming 35 squares makes you tired.
Whip stitch. Lay two squares together and whip stitch along one edge with a yarn needle. Hold them right sides together for a seam that disappears, or wrong sides together if you want a small visible ridge as a design feature. Working through the back loops only keeps the seam flat. It is simple, sturdy, and forgiving for beginners.
Slip stitch join. Use your hook to slip stitch the squares together through the edge stitches. This creates a defined, raised ridge on one side, which can look deliberate and neat in a contrast color. It works up quickly once you have the rhythm.
Continuous (flat-braid) join. A more advanced method worked in one pass, with chains running between the squares to form a lacy lattice. It is beautiful and airy, but it asks more of you than the others, so save it for when the basics feel automatic.
If you are deciding between styles, our granny square patterns guide shows how different joins read in a finished piece.
Adding a border
A border is what turns a grid of squares into a finished blanket. It frames the work, evens out the edge, and quietly hides the ends and join lines around the perimeter.
Start with a single round of single crochet (UK: double crochet) all the way around. This evens out the bumpy edge that joined squares always have and gives the next rounds a clean foundation to sit on. From there, add a few rounds of granny clusters in your border color, or keep it plain with more single crochet rounds. Three to five rounds is plenty for a throw; a baby blanket often looks balanced with two or three. Work three stitches into each corner space on every round so the border lies flat instead of cupping.
Planning the color
Color is where a granny square blanket becomes yours. There are three common approaches.
A scrap or stash blanket uses a different color combination in every square, then ties the chaos together with a single unifying border color. It is the classic way to use up leftovers, and no two squares need to match.
A planned palette uses a fixed set of colors that repeat across the grid in a deliberate pattern. This gives a calmer, more designed look, and it is easier to buy yarn for because you know your exact colors up front.
The most useful trick sits between the two. Work every square with a different scrappy center but the same color on the final round. That shared last round acts like a built-in frame around each motif, so even a wildly mixed blanket reads as one cohesive piece. It is the quiet secret behind most scrap blankets that look intentional rather than random.
How much yarn you need
Yarn amounts depend on size, square size, and how dense your tension is, so plan with a margin. As rough guidance for worsted weight, a baby blanket needs about 800 to 1,000 yards total, and a throw needs about 1,500 to 2,000 yards. A lapghan sits between the two. Larger blankets scale up from there.
Buy a little extra of whichever color you use for the border and the joins, since that color appears in every square and around the whole edge, so it runs out first. Worsted is the standard choice for blankets because it works up fast and wears well; you can read more in our worsted weight yarn guide. Cotton makes a crisper, heavier blanket if you prefer that hand. Whatever you choose, buy all of one color in the same dye lot at once, because a mid-project skein from a different lot can show as a faint stripe.
Managing the ends
The honest downside of the many-squares method is the ends. Every square has at least a starting tail and a finishing tail, and a 35-square blanket can leave you with 70 or more to weave in. It is the part nobody photographs.
Two choices cut this down a lot. JAYGO joins as you build, so you weave ends as you go instead of facing a mountain at the end. And keeping the same color on the final round of every square means you can carry that color between squares rather than cutting and rejoining each time. The one-giant-square method sidesteps the problem almost entirely, since a single square has only a handful of color-change ends no matter how big it gets. Weave each tail under several stitches in two directions with a yarn needle so it cannot work loose in the wash.
Frequently asked questions
How many granny squares do I need for a blanket?
Divide your blanket width and length by your square size, round each to a whole number, then multiply. For a 30 by 40 inch baby blanket with 6 inch squares, that is 5 across by 7 down, so about 35 squares plus a border. Smaller squares mean more of them.
What size should a granny square blanket be?
It depends on use. A lovey is about 14 to 17 inches square, a baby blanket around 30 by 40 inches, a lapghan about 36 by 48, a throw roughly 50 by 60, and a twin around 66 by 90. These are approximate and shift with your gauge and border.
What is the easiest way to join granny squares?
Join-as-you-go (JAYGO) is the most popular because it seams during the final round and leaves fewer ends. Whip stitch and slip stitch joins are sturdy and simple. The continuous flat-braid join gives a lacy lattice but is more advanced. Pick by the look and finishing time you want.
How much yarn do I need for a crochet granny square blanket?
For worsted weight, a baby blanket needs roughly 800 to 1,000 yards and a throw about 1,500 to 2,000 yards. Amounts vary with square size and tension, so buy a little extra of your border and join color, since it appears in every square and runs out first.
Is it better to make one big granny square or many small ones?
One big square needs no joining and has very few ends, but it gets heavy and unwieldy as it grows. Many small squares are portable and great for using up scrap yarn, but they create more seaming and many ends to weave in. Choose by how and where you want to work.
How do I make a scrappy granny square blanket look cohesive?
Work every square with a different scrappy center but the same color on the final round. That shared last round frames each motif so the whole blanket reads as one piece. A single unifying border color around the finished blanket ties it together even further.