
The other half of knitting
If you can knit, you are halfway to everything. The purl stitch is the second of the two stitches that all of knitting is built from. Knit and purl are the same action seen from two sides, and once you have both, you can make stockinette, garter, ribbing, seed stitch, and almost any texture a pattern asks for.
The purl stitch feels awkward at first because the yarn sits in front and your hands move in a slightly different order. That awkwardness fades fast. This guide walks through the purl stitch step by step, shows how it combines with the knit stitch, and fixes the small mistakes that trip up new knitters.
If you have not learned the knit stitch yet, start with our calm introduction to knitting, which covers casting on and the knit stitch first. Purl makes the most sense right after that.
How to purl step by step
Hold the needle with your stitches in your left hand and the empty needle in your right. Make sure your working yarn is in front of the work, not behind.
- With the yarn in front, insert the right needle into the first stitch from right to left, going in front of the left needle. The two needles cross with the right needle on top.
- Wrap the working yarn around the right needle counterclockwise, bringing it over the front of the right needle.
- Push the right needle down and back through the stitch, catching the wrapped yarn and pulling it through to form a new loop on the right needle.
- Slide the old stitch off the left needle. One purl stitch is complete.
Repeat across the row. When every stitch has moved to the right needle, swap the needles between your hands and start the next row.
Knit and purl together
The reason purl matters is what it lets you build. A few combinations cover most of knitting:
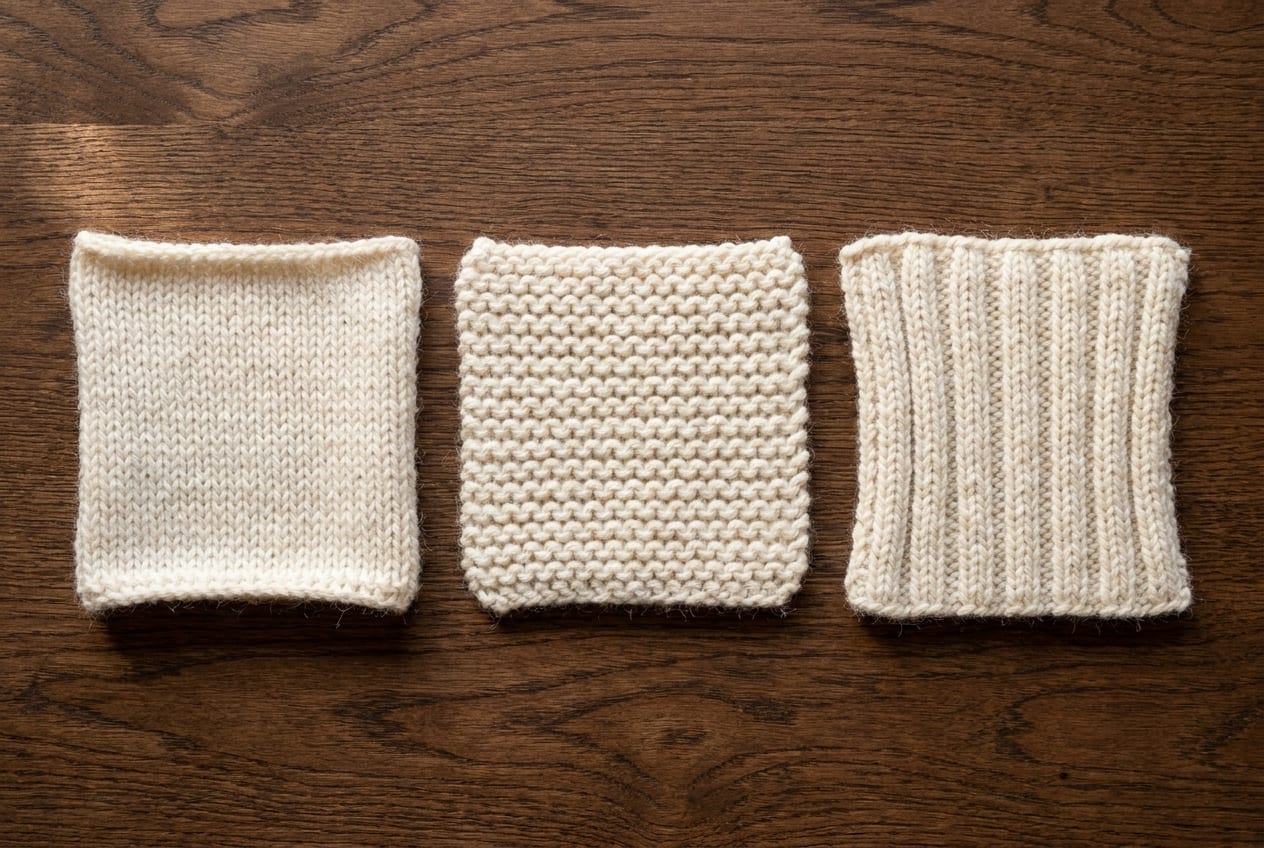
- Stockinette stitch. Knit one row, purl the next, and repeat. This gives the smooth V-shaped "right side" most people picture when they think of knitting, with the bumpy purl side as the back.
- Garter stitch. Purl every row (or knit every row, they look the same). This gives a squishy, ridged fabric that lies flat.
- Ribbing. Alternate knit and purl stitches within the same row, such as knit two, purl two. Ribbing pulls in and stretches, which is why it is used for cuffs and hems.
- Seed stitch. Like ribbing but offset each row, giving an even, bumpy texture that also lies flat.
Charted, knit and purl are just two simple marks: a vertical symbol for knit and a horizontal one for purl.
- Knit
- Purl
A knit-two, purl-two rib reads like this on a chart, with the knit and purl columns alternating across the row.
Reading your stitches
Once you can purl, you can read your knitting, which saves you from counting rows over and over. A knit stitch shows as a smooth V on the side facing you. A purl shows as a small horizontal bump sitting just below the needle. In stockinette, the side covered in Vs is the right side and the bumpy side is the wrong side. In garter, both sides look like rows of bumps.
Learning to spot the difference means you can glance at your work and know whether the next row should be knit or purl, and catch a stitch worked the wrong way before it travels up the fabric. This same skill makes shaping easier later, since a decrease like the SSK is simplest to place when you can read exactly where you are.
Three common purl mistakes
Leaving the yarn at the back
The most frequent purl error is starting with the yarn behind the work, as if to knit. Purl needs the yarn in front. If your fabric grows extra stitches or looks lumpy, check that the yarn is in front before each purl.
Accidental yarn overs
Bringing the yarn over the needle instead of around it can create an extra loop, adding a stitch you did not mean to. Wrap the yarn counterclockwise around the needle and keep the motion small.
Twisted stitches
Inserting the needle the wrong way mounts the stitch backward, and the next row it knits up twisted and tight. Insert from right to left into the front of the stitch, and your stitches will sit open and even.
Frequently asked questions
What is the purl stitch?
The purl stitch is one of the two basic stitches in knitting, the reverse of the knit stitch. You work it with the yarn held in front, inserting the right needle from right to left into the front of the stitch. Knit and purl together form nearly every knitted fabric.
What is the difference between knit and purl?
They are the same stitch seen from opposite sides. A knit stitch makes a smooth V on the side facing you, while a purl makes a bump. The yarn sits at the back for a knit stitch and in front for a purl. Combining them creates stockinette, ribbing, and texture.
How do you make stockinette stitch?
Knit one row, then purl the next row, and repeat. Working flat, you alternate a knit row on the right side with a purl row on the wrong side. The result is the smooth, V-patterned fabric most people picture when they think of knitting.
Why does my purl row look messy?
The usual causes are the yarn drifting to the back, accidental yarn overs that add stitches, or stitches inserted the wrong way so they twist. Keep the yarn in front, wrap it counterclockwise with a small motion, and insert the needle into the front of each stitch.
Is purling harder than knitting?
It feels harder at first because the hand motion is slightly different and the yarn position changes. With a little practice it becomes just as automatic as the knit stitch. Most knitters are comfortable purling within their first few projects.
Pinterest pin headlines (internal reference, strip before publish)
- A: "How to Purl: The Other Half of Knitting"
- B: "Knit + Purl = Everything (Here's Purl)"
- C: "Fix Your Messy Purl Row in One Check"