What blocking does to crochet
Blocking is the step between finishing a crochet piece and considering it truly done. It involves wetting or steaming the finished item and then shaping it while damp so the fibers set in the position you want.
The transformation can be significant. A crinkled, slightly wavy crochet shawl becomes flat and even. Granny squares that refuse to lie flat pull into neat geometry. A lace pattern that looks like a jumbled mess of holes opens up into crisp, readable shapes. Stitches that looked uneven become more consistent as the fibers relax into their final position.
Not every project needs blocking. A thick acrylic dishcloth, a chunky cowl, a stuffed amigurumi figure, none of these benefit much from the process. But for lace, fine yarns, anything that needs to lay flat or hold a specific shape, and garments where fit matters, blocking is worth doing every time.
What you need for blocking
You do not need much equipment to start blocking crochet:
- Foam blocking mats: interlocking foam puzzle tiles work well. You need a surface you can push pins into that is large enough to hold the piece laid flat. Floor exercise mats or children's foam tiles work too.
- Rust-proof T-pins or blocking wires: T-pins hold the piece at specific points. Blocking wires thread along the edges of shawls and lace pieces for a smoother line.
- A spray bottle: for spray blocking.
- Wool wash or mild soap: for wet blocking.
- Towels: for absorbing excess water.
- A measuring tape: to check dimensions as you pin.
For steam blocking, you also need an iron with a steam function.
Method 1: Wet blocking
Wet blocking is the most thorough method and works well for wool, cotton, alpaca, and most natural fiber blends. It is the best choice for lace and for anything that needs to be stretched significantly into shape.
How to wet block crochet:
- Fill a basin or clean sink with cool or lukewarm water. Add a small amount of wool wash or mild soap if the piece needs cleaning at the same time.
- Submerge the finished piece fully and let it soak for ten to twenty minutes. The fibers need to be saturated, not just damp.
- Gently squeeze the water through the piece. Do not rub, twist, or wring, especially with wool, which felts under agitation.
- Lift the piece out of the water supporting its full weight (wet yarn is heavier than it looks and can stretch out of shape if you lift from one corner).
- Roll the piece in a dry towel and press firmly to remove excess water. Unroll and check the piece is still roughly the right shape.
- Lay the piece on your foam mats and begin pinning, starting from the center and working out to the edges. Use your measuring tape to check that the dimensions match your target measurements.
- Leave the piece pinned until it is completely dry. This can take anywhere from a few hours to overnight depending on the thickness of the yarn and the humidity in the room.
Method 2: Spray blocking
Spray blocking is gentler than wet blocking and better suited to projects that only need slight adjustment rather than significant reshaping. It is also the faster option for acrylic blends and for pieces that cannot withstand full submersion.
How to spray block crochet:
- Lay the dry piece on your foam mats and pin it to the desired shape first.
- Fill a spray bottle with clean water. Mist the piece evenly until it is damp throughout but not soaking wet.
- Adjust any pins that need repositioning while the piece is damp.
- Leave it pinned until fully dry.
Spray blocking is particularly useful for blocking individual motifs before joining, like granny squares where you want each one to match but do not want to wet-block an entire set at once.
Method 3: Steam blocking
Steam blocking uses heat and moisture together to relax fibers. It works differently depending on the yarn fiber and is the method with the most caveats.
For wool and natural fibers: hold a steam iron a few centimeters above the piece (never touching it) and let the steam penetrate the fabric. You can also place a damp pressing cloth on the piece and hover the iron over it. Pin to shape and let cool before unpinning.
For acrylic: steam can relax acrylic stitches and make the fabric softer and slightly more defined. The effect is less dramatic than on wool, and it is not permanent in the same way. Keep the iron moving and do not let it touch the yarn directly.
Never steam block acrylic directly with a hot iron. Placing a hot iron directly on acrylic yarn melts the synthetic fibers and permanently destroys the texture of the yarn, a technique sometimes deliberately used called "killing" the yarn, but it is irreversible and produces a limp, flat fabric that cannot be restored.
How to block granny squares flat
Granny squares and other geometric motifs almost always benefit from blocking because the joining process can cause slight warping and the corners tend to curl up.
Pin each square to your foam mat individually. Use four pins at the corners first, checking that the square is true (all corners at right angles, all sides the same length). Then add pins along each side at regular intervals to keep the edges straight. Wet the square thoroughly using spray or submersion.
Blocking all squares to the same dimensions before joining them saves significant effort during assembly. A set of evenly blocked squares lies flat naturally when joined; unblocked squares often produce a joined blanket that ripples or pulls.
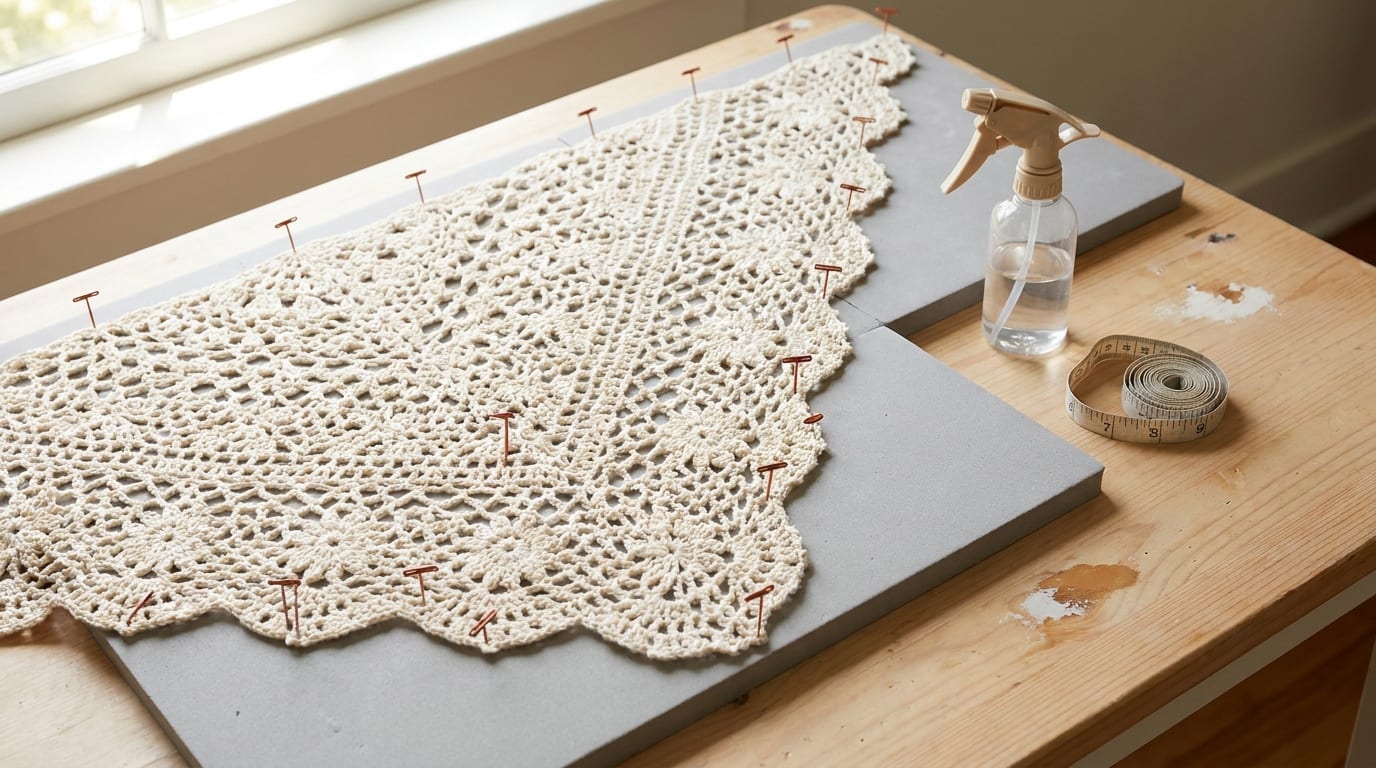
How to block a shawl
Shawls, especially those with pointed or scalloped edges, benefit most from blocking wires threaded along the straight edges and individual pins at each point.
Thread blocking wires along the top edge of the shawl before pinning to a mat. The wire distributes the tension evenly and produces a smoother line than dozens of individual pins. At each point or scallop along the bottom edge, place one pin at the tip and pull gently to emphasize the shape. Wet thoroughly and leave until completely dry.
For a triangular shawl, start by pinning the center back of the top edge, then pin each end of the top edge, establishing the full width. Then work down to the center bottom point, pinning it last. Fill in the remaining edge points evenly on each side.
How to wash finished crochet pieces
Hand washing is the safest method for any yarn you are uncertain about. Fill a basin with cool water, add a small amount of wool wash or gentle soap, submerge the piece, and gently squeeze the water through. Do not rub or wring. Rinse in cool clean water until no soap remains. Press out excess water against the basin wall, roll in a towel, and lay flat to dry.
Machine washing is fine for most acrylic and superwash wool yarns. Use a delicate or wool cycle, cool water, and a mesh laundry bag to protect the piece from being stretched or pulled. Never put crochet in a fast spin cycle.
Dry flat, always. Hanging a wet crochet piece to dry stretches it under its own wet weight. Drape it over a drying rack if needed, but support the full piece rather than hanging from one point.
Fiber-specific notes
Wool felts when exposed to heat and agitation simultaneously. Hot water plus rubbing equals felt. Cool water and gentle handling keep it safe. Superwash wool has been treated to prevent felting and is more forgiving.
Acrylic can be machine washed on cool and low tumble dried. It does not felt. However, high heat in the dryer can cause pilling and can permanently alter the texture. Low heat or air dry is safer.
Cotton is durable and can handle slightly warmer water than wool, but it has no stretch and can distort if not supported properly when wet. Lay flat to dry and block while damp if the piece has come out of shape.
Alpaca is delicate and should be hand washed in cool water with a gentle soap. It can be very heavy when wet and should never be hung while damp.
For guidance on how fiber content is listed on yarn labels and what care symbols mean, see our guide to how to read a yarn label. And if you are choosing a new yarn for a project and wondering how fiber content affects substitution choices, our yarn substitution guide walks through the key considerations.