Why a crochet leaf pattern finishes a flower project
A crochet flower without a leaf looks unfinished. The leaf is what tells the eye it is looking at a plant, and it is what gives a bouquet or a wreath its depth. The good news is that a basic crochet leaf pattern is one of the fastest things you will ever make. Most leaves are a single round of stitches worked along both sides of a short foundation chain, and you can finish one in a few minutes once the rhythm clicks.
This guide walks through the most common method for how to crochet a leaf, worked around a center chain so both halves mirror each other. You will learn the basic pointed leaf step by step, how to add a raised center vein, and how to change the shape into a rounder leaf, a long narrow one, or a serrated holly-style leaf. Every version here is a free crochet leaf pattern you can work from the written steps, no purchase needed.
What you need
The supply list is short, and a leaf uses so little yarn that scraps are perfect for it.
- A small amount of green yarn. Cotton in a leaf green is the classic choice. Any leftover from another project will do, since a single leaf rarely uses more than a few yards.
- A hook to match. A 3.5 to 4.0 mm hook suits most cotton yarn and gives a firm, crisp leaf. If you go up to worsted weight yarn, move up to a 5.0 mm hook.
- A yarn needle and scissors. The needle weaves in the starting tail and sews the leaf onto a flower, an applique backing, or a stem.
That is everything. The stitches themselves are ones you likely already know. If you want a refresher on the tallest one used here, the double crochet stitch page has step-by-step photos.
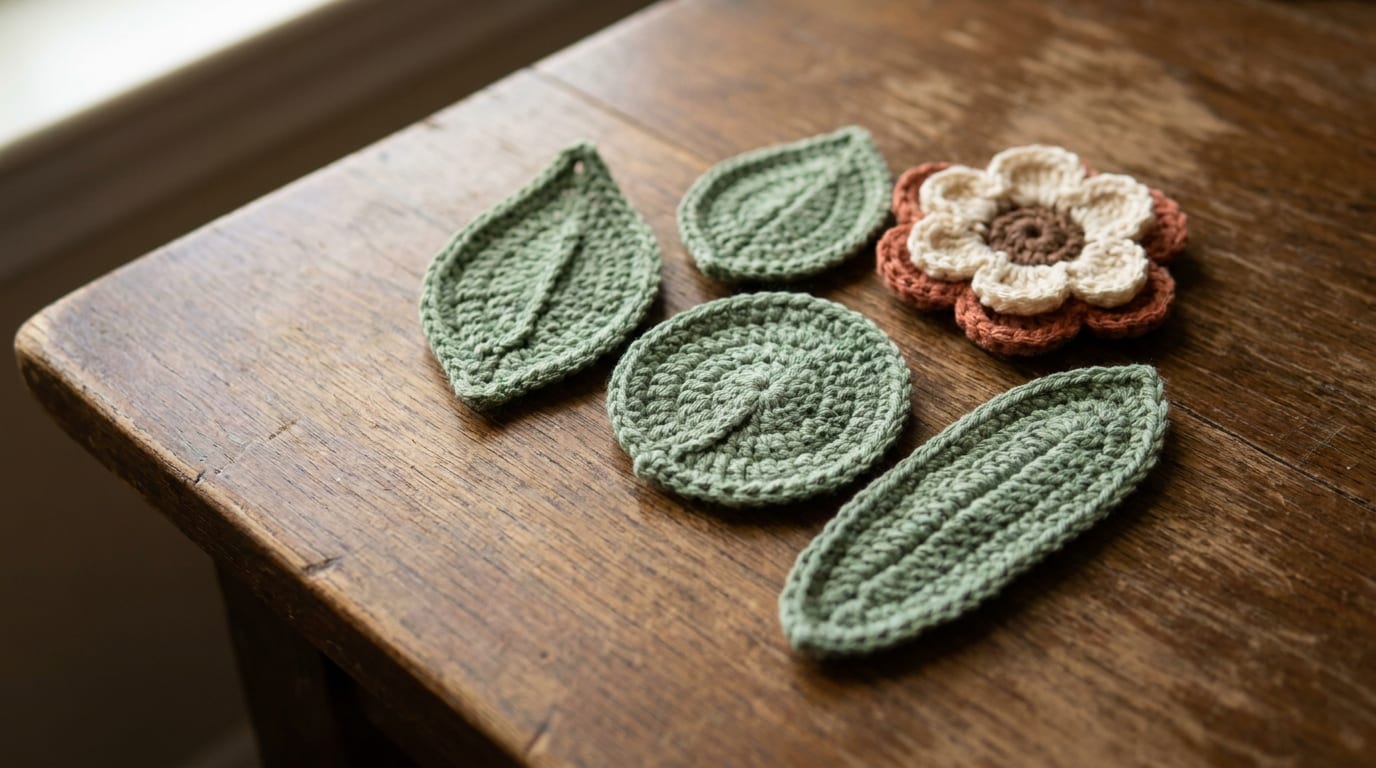
The basic pointed leaf, step by step
This is the leaf you will reach for most often. It is worked as one continuous round, traveling down one side of a foundation chain to a point at the tip, then back up the other side so the two halves match. The stitches grow taller toward the middle and shrink again toward the ends, and that rise and fall is what creates the belly and the point of the leaf.
A quick note on terms before you start. This pattern uses US stitch names with the UK name in parentheses: single crochet (sc, UK double crochet), half double crochet (hdc, UK half treble), and double crochet (dc, UK treble). Check which system you are reading, then work the steps in order.
- Chain the foundation. Chain the length you want the finished leaf to be, plus a few extra stitches for a stem if you want one. For a small leaf, chain 8 to 10. The last few chains nearest your starting tail can become a short stem, or you can ignore them and start the leaf at the very end.
- Work back down the first side, growing then shrinking. Starting in the second or third chain from the hook, place stitches that climb in height and then come back down to shape the belly of the leaf: slip stitch, single crochet, half double crochet, double crochet, half double crochet, single crochet. The double crochet in the middle is the widest part of the leaf.
- Turn the tip. Work several stitches into the very last chain to round the point. Three single crochet, or a single crochet, chain 1, single crochet, fans the stitches around the end so the tip is sharp but not pinched. This is the top of the leaf.
- Work back up the other side with the mirror sequence. Now crochet along the unused loops on the opposite side of the same foundation chain, repeating the heights in reverse so the second half matches the first: single crochet, half double crochet, double crochet, half double crochet, single crochet, slip stitch.
- Join and fasten off. Slip stitch into the base where you began, then fasten off and pull the yarn through. Leave a tail of several inches so you can sew the leaf onto a flower or attach it to a stem later.
Take it slowly the first time. If the leaf curls or cups, your tension is a little tight, and the next one will sit flatter as your hands learn the shape.
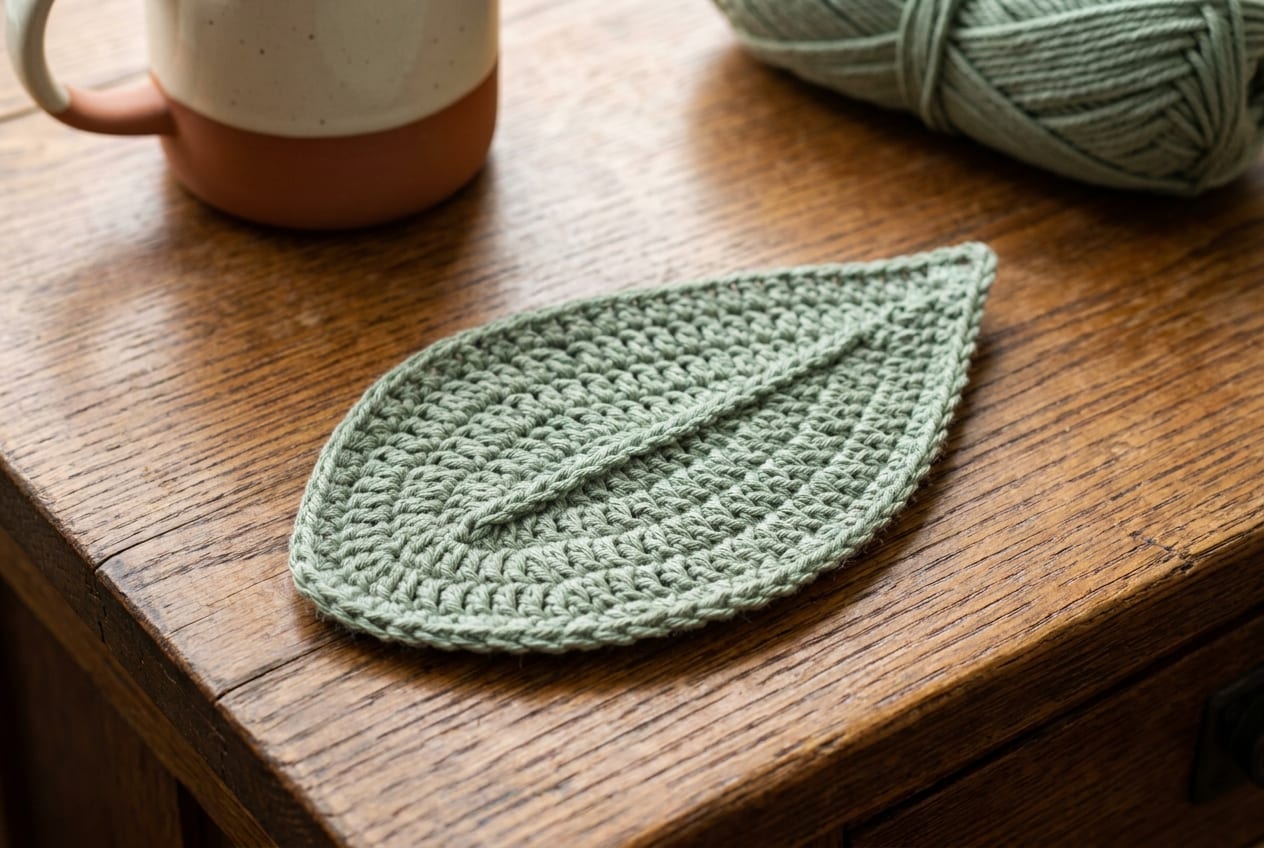
Adding a center vein
A center vein is the small detail that turns a flat shape into a believable leaf, and it is optional. If you want a plain, simple leaf, skip this part entirely and the leaf is done.
For a raised vein, work a line of surface slip stitch up the middle of the finished leaf. Hold a length of the same green yarn behind the leaf, insert your hook from the front through to the back near the base, draw up a loop, then continue pulling loops through and along the center line of stitches to the tip. Each pull makes one slip stitch sitting on the surface, and the row of them reads as a raised central vein.
A faster alternative is to build the vein as you go. Before working the second side, chain up the middle of the leaf from base to tip, then carry on with the mirror sequence around the outside. The chain sits along the center and gives a softer ridge than surface slip stitch. Either way, keep the vein straight and centered so the two halves of the leaf stay even.
Leaf variations: round, long, and serrated
Once you can work the basic pointed leaf, small changes to the stitch heights and the edge give you a whole set of shapes. Each one is a free crochet leaf pattern in its own right, built on the same chain-and-mirror method.
| Leaf shape | What changes | Stitch sequence per side | |---|---|---| | Pointed (basic) | Balanced rise and fall | sc, hdc, dc, hdc, sc | | Round | More equal heights, gentle tip | sc, hdc, hdc, hdc, sc | | Long and narrow | Taller stitches in the middle | hdc, dc, tr, dc, hdc | | Serrated (holly) | Picots along the edge | sc, picot, sc, picot, sc |
A rounder leaf
For a leaf with a soft, broad shape, use more stitches of equal height and a gentler tip. Swap the single tall double crochet in the middle for a run of half double crochet, and turn the point with two or three single crochet instead of a sharp fan. The result is a rounded leaf that suits roses and other full-petaled flowers.
A long, narrow leaf
To make a long, slim leaf, reach for taller stitches in the center. Replace the middle double crochet with a treble crochet (tr, UK double treble), which adds height and stretches the belly of the leaf outward into a longer oval. Lengthen the foundation chain a little to match. These work well as fern fronds or as the spiky leaves around a sunflower.
A serrated, holly-style leaf
For a toothed edge, add picots as you work each side. A picot is a small chain that loops back on itself: chain 3, then slip stitch into the first of those chains to make a tiny point. Place a picot between stitches along both edges, and the leaf takes on the serrated, holly-like look that suits winter wreaths and festive garlands.
For an even thicker leaf, you can work in rows back and forth instead of around a chain, decreasing a stitch at each end of every row until the rows narrow to a point. A leaf built this way has more body and a defined right and wrong side, which is useful when the leaf needs to stand up on a wired stem.
Yarn and hook for a crisp leaf
The yarn you choose decides how the leaf holds its shape. Cotton in green is the reliable pick, because cotton has very little stretch and keeps the leaf crisp and flat. A 3.5 to 4.0 mm hook paired with cotton gives tight, defined stitches that show the leaf outline clearly, which matters most for appliques and anything that will be seen up close.
Worsted weight yarn makes a bigger, softer leaf with a looser drape. It works up faster and suits larger projects like a chunky garland or a leaf sewn onto a hat, but the edges are less sharp than cotton. Wool sits in between, with a little spring and a soft surface. For most flower work, a smooth cotton in one or two shades of green gives the most botanical result, and a touch of variegated green can add natural-looking shading across a cluster of leaves.
What to do with your crochet leaves
A pile of finished leaves opens up a long list of projects. The most common use is to pair them with crochet flowers. Tuck a leaf or two behind a bloom and sew them together, and a single flower becomes a sprig. Our crochet flowers guide covers the blooms themselves, the how to crochet a rose tutorial walks through a layered rose, and the crochet sunflower post pairs naturally with the long, narrow leaf above.
Beyond bouquets, crochet leaves make quick appliques for hats, bags, and cushion covers, where you simply sew the finished leaf onto the surface. Strung together, they become garlands and wreaths for a mantel or a door. For a standing bouquet, sew or wrap the leaf onto a length of floral wire to make a stem, then bend the wire to angle the leaf however you like. When you are ready to build a full arrangement, the flower pattern hub collects flower and leaf patterns to mix and match.
Frequently asked questions
How do you crochet a simple leaf?
Chain 8 to 10, then work back along the chain with stitches that grow and shrink in height: slip stitch, single crochet, half double crochet, double crochet, half double crochet, single crochet. Fan a few stitches into the last chain for the tip, then mirror the sequence back up the other side and join with a slip stitch.
Is there a free crochet leaf pattern I can use?
Yes. Every version in this guide is a free crochet leaf pattern worked from written steps, including the basic pointed leaf, a rounder leaf, a long narrow leaf, and a serrated holly leaf. You only need scrap green yarn and a hook, with no purchase or download required.
What yarn should I use for crochet leaves?
Cotton in green is the usual choice because it has little stretch and keeps the leaf crisp and flat, which suits appliques and flowers. Use a 3.5 to 4.0 mm hook with cotton. Worsted weight yarn makes a bigger, softer leaf with a looser shape, paired with a 5.0 mm hook.
How do I add a vein to a crochet leaf?
Work a line of surface slip stitch up the center of the finished leaf, drawing loops through from base to tip so they sit raised on the surface. Alternatively, chain up the middle before working the second side. Both create a central vein, or you can leave it off for a plain leaf.
How do I make a crochet leaf with a stem?
Add a few extra chains to the foundation when you start, and work the leaf shape from the end of the chain so the spare chains trail off the base as a short stem. For a standing stem in a bouquet, sew or wrap the leaf onto a length of floral wire instead.
How long does it take to crochet a leaf?
A basic pointed leaf takes only a few minutes once you know the stitch sequence, since it is a single round worked around a short chain. Adding a center vein or picot edge adds a minute or two. Most makers can produce a small batch of leaves for a bouquet in one sitting.